Tech Guide
AI Mobile App Development: A Journey from Idea to Application Using Only ChatGPT


Have you ever been on the precipice of a ground-breaking app idea only to realize the path to its creation starkly echoes climbing Everest? The painstaking hours invested in coding, exhaustive debugging routines, and the relentless journey to make every feature as user-friendly as possible. Yes, it can feel like an imposing cliff.
Few technologies in the last decade have imparted such a transformative touch on the landscape of application development. Imagine a world where artificial intelligence isn't just a buzzword but an everyday tool that empowers us to create innovative solutions, even in areas lacking expertise. This isn't a distant future, but a reality I experienced firsthand. It's no longer about only the giants in the tech arena because, with AI, even a focused startup or an individual today can make an app that truly touches lives.
As a JavaScript developer with limited Python knowledge, I embarked on a journey to make an app for my fellow developers, armed with nothing but an idea and the power of AI. This is the story of AI in mobile app development and how I used ChatGPT to transform a simple concept into a practical tool in less than 2 hours. I will also share my advice on using AI tools for app development like ChatGPT as efficiently as possible.
Stay tuned as I delve into how AI based app development and how I brought it to life using ChatGPT.
The Origin of an Idea: AI Mobile App Development using ChatGPT
I do a lot of web development, both commercially and for hobby projects. One day, I noticed that my hard drive was almost full, even though I kept no media (movies, books, etc.) or heavy apps on my laptop. I was wondering what had happened when I accidentally opened the properties of my old project folder. I was stunned by how extensive the directory was.
After some research, I realized the only weighty part was the node_modules folder, where JS stores all the libraries used as dependencies. Then I realized I had loads of projects and, therefore, loads of node_modules locations all over my PC. I was terrified by the idea of removing everything manually. Then suddenly, I had a brilliant idea: since I'm a software engineer, why don't I build a utility script to solve that problem? This is where AI in app development came in.
So the app was created to help JavaScript developers like myself clean up their PCs by finding and removing node_modules folders within a selected parent directory. Since these folders can consume significant storage space, the app offers a user-friendly interface that lists all directories contained node_modules within a parent folder. From there, users can select which folders to delete, freeing up storage space.
The goal was to explore the app development using AI and create a cross-platform app for Windows, MacOS, and Linux using a single code base, inspired by my own experiences and the common issues faced by the community.
Embracing the Unknown
Starting this project was like stepping into the dark. I build websites, so Python and PyQt6 were new to me. The idea of learning a new language and system was scary. But with help from ChatGPT for AI-driven mobile app development, I felt brave enough to go ahead. It seems like ChatGPT can successfully serve as a personal CTO, as it's capable of advising on which tech stack and architecture you should use. Amazing, isn't it?
In short, ChatGPT suggested Python and Qt as the right tools for my project and even helped me write the code. This was my first time using AI to develop an app using AI, and I was more than happy with the results. However, ChatGPT requires some skills to use it to its fullest. Here's a list of tips to help you use it more effectively for AI app development, brainstorming ideas, or completing any other tech-related task:
- Provide as much context and information as possible → The more details, the better ChatGPT’s responses will be. By context, I mean the general reasons for creating or researching that app. If you explain it clearly enough, ChatGPT will give you original ideas, features, or suggestions that might be useful.
- Familiarize yourself with technical terms → You definitely don't need a Computer Science degree, but having some technical knowledge will help you immensely. You should know the specific names of UI components if you ask ChatGPT to add them. Understanding Computer Science terms generally might make it much easier for you to explain the desired behavior of the product you're building with AI.
- First, provide general information and context, then explain the specifics of your desired implementation → This approach will give ChatGPT some context and allow it to advise you on your app design and overall app usage. You won't have to make as many changes to the output generated by AI, as it will have a clearer vision of the final product from the start.
AI Tool for App Development: Coding Begins
Now we know how to use ChatGPT and have a clear vision of the end-term product and its features. Let’s now start building it. So, here’s the plan on how to develop AI based app:
- Ask about the required steps (installing the desired coding language, libraries, coding, and app building).
- Ask ChatGPT to develop the product by iterations: each query will be a new feature or fix so that we do one feature at a time so that we can improve that new feature in case something goes wrong.
- Final testing and using the product to clean my hard drive.
Below I’ll provide my queries and list ChatGPT’s answers. Please note that I used the GPT4 model for that process, and I’m only listing the most critical queries. You can see the entire dialogue here and the complete source code here.
General Steps Required
Which technologies shall we use?
I want to create a simple UI app that would provide a folder input, iterate recursively over each sub-folder and delete files within folders with specific names. I would like this app to be a Windows, macOS and Linux native app and i want to build it from one code base. The only system specific API in planning to use is the file system one. Which programming language , framework or UI lib suits that need the best and why?
Here’s the response of ChatGPT:
Given the requirements you've outlined, a good solution for you could be the combination of Python and PyQt5. Python is a versatile, high-level programming language that is suitable for a variety of tasks, including file system operations. It also has strong cross-platform compatibility and can run on Windows, macOS, and Linux. PyQt5, on the other hand, is a set of Python bindings for the Qt application framework that can be used to create cross-platform applications with a native look and feel.
Here's why this combination could work well for your needs:
Python's cross-platform capabilities: Python is widely known for its capability to work seamlessly across different platforms, including Windows, macOS, and Linux. This means you can write one set of code that will work on all three operating systems. Additionally, Python has theosandshutilmodules which provide functionalities for file and directory operations that you need, such as recursive iteration over folders and file deletion.
PyQt5 for GUI development: PyQt5 provides tools to create complex GUI applications. It's a very flexible and powerful framework that has good cross-platform support. Since it's a Python library, you can integrate it easily into your Python code.
Easy to learn and use: Both Python and PyQt5 are known for their simplicity and readability, which makes it easier for you to pick them up if you're not already familiar with them.
Strong community support: Python has one of the largest and most active programming communities. This means you're more likely to find help or resources online if you encounter issues.
Remember to include pyinstaller or similar tools in your workflow, which can be used to package your Python applications into stand-alone executables for Windows, macOS, and Linux.The downside to this approach is that the app won't be truly "native". While it will run on each of these platforms, it won't have the exact look and feel of applications built specifically for these platforms using the platform's native frameworks (like .NET for Windows or Cocoa for macOS). However, PyQt5 is still very capable and should be able to provide a user experience that's close enough to a native app for most purposes.
Here’s the first query on a general product structure:
I want to create a simple UI app to give JavaScript devs the ability to clean their PCs by creating an app that allows you to find and remove all the node_modules folders that are inside a selected parent directory. That app would provide a folder input where user enters a parent directory(e.g. hard drive D:/, or a folder inside it in windows, or ~/Documents in macOS), iterate recursively over each sub-folder inside a parent directory , render a list with folder directories(list every a path to every folder called node_modules) and a select input, then give user the ability to select folders he want to delete & then delete files. . I would like this app to be a windows, macos and linux native app and i want to build it from one code base. How do i do it using Python and PyQt5? I also need to compile the app to executables.Here’s the ChatGPT answer:
Creating a cross-platform desktop application with Python and PyQt5 for the purpose you described involves a few steps:
Designing the UI: PyQt5 allows for designing the user interface with widgets like labels, text fields, buttons, etc. It also allows for the design of the interface using Qt Designer, which is a drag-and-drop interface to design the GUI.
Coding the functionality: For your use case, the functionality would include:
Providing an input for the user to specify a directory.
Recursively iterating over subdirectories within the specified directory to find folders named node_modules.Rendering the list of these directories for the user to select from.
Implementing functionality to delete the selected directories.
Compiling the application to executables: Python provides various tools to compile Python applications to standalone executables, such as PyInstaller, Py2exe, etc. These tools can be used to generate executables for different platforms (Windows, macOS, Linux).
Here's a basic outline of how you could structure the application:
Design the UI: The UI would include a QLineEdit widget for the user to input a directory, a QTextEdit or QListView widget to display the list of node_modules directories, a QPushButton to start the search and delete operation, and a QProgressBar to show the progress of the operation.Implement the functionality:
Connect a slot (function) to the QPushButton's clicked signal that will start the operation.
In this slot, get the directory input from the QLineEdit widget.
Use os.walk or similar function to recursively iterate over subdirectories in the specified directory and find "node_modules" directories.
Update the QTextEdit or QListView widget with the found directories.
Implement functionality to allow the user to select directories from the list and delete them. This could involve connecting another slot to the QPushButton's clicked signal that will delete the selected directories.
Compile the application to executables: Use PyInstaller or similar tool to generate executables for the desired platforms.
It seems like we got everything we need → let’s start the actual coding process 👇
Develop App with AI: Building the “Clean My Modules” App by Iterations Using ChatGPT
So in the reply above, ChatGPT also provided a skeleton for the project:
from PyQt6.QtWidgets import QApplication, QLineEdit, QPushButton, QVBoxLayout, QWidget, QListView, QListWidgetItem, QListWidget
import os
import shutil

class App(QWidget):
    def __init__(self):
        super().__init__()

        self.title = 'Node Modules Cleaner'
        self.initUI()

    def initUI(self):
        self.setWindowTitle(self.title)

        # Create widgets
        self.layout = QVBoxLayout()
        self.directory_input = QLineEdit()
        self.search_button = QPushButton('Search')
        self.delete_button = QPushButton('Delete')
        self.modules_list = QListWidget()

        # Connect signals and slots
        self.search_button.clicked.connect(self.search)
        self.delete_button.clicked.connect(self.delete)

        # Set layout
        self.layout.addWidget(self.directory_input)
        self.layout.addWidget(self.search_button)
        self.layout.addWidget(self.delete_button)
        self.layout.addWidget(self.modules_list)
        self.setLayout(self.layout)

    def search(self):
        directory = self.directory_input.text()
        for root, dirs, files in os.walk(directory):
            if 'node_modules' in dirs:
                item = QListWidgetItem(root + '/node_modules')
                self.modules_list.addItem(item)

    def delete(self):
        for item in self.modules_list.selectedItems():
            shutil.rmtree(item.text(), ignore_errors=True)
            self.modules_list.takeItem(self.modules_list.row(item))

# Create the application
app = QApplication([])
ex = App()
ex.show()
app.exec()
Here’s what the app looks like when we launch it:
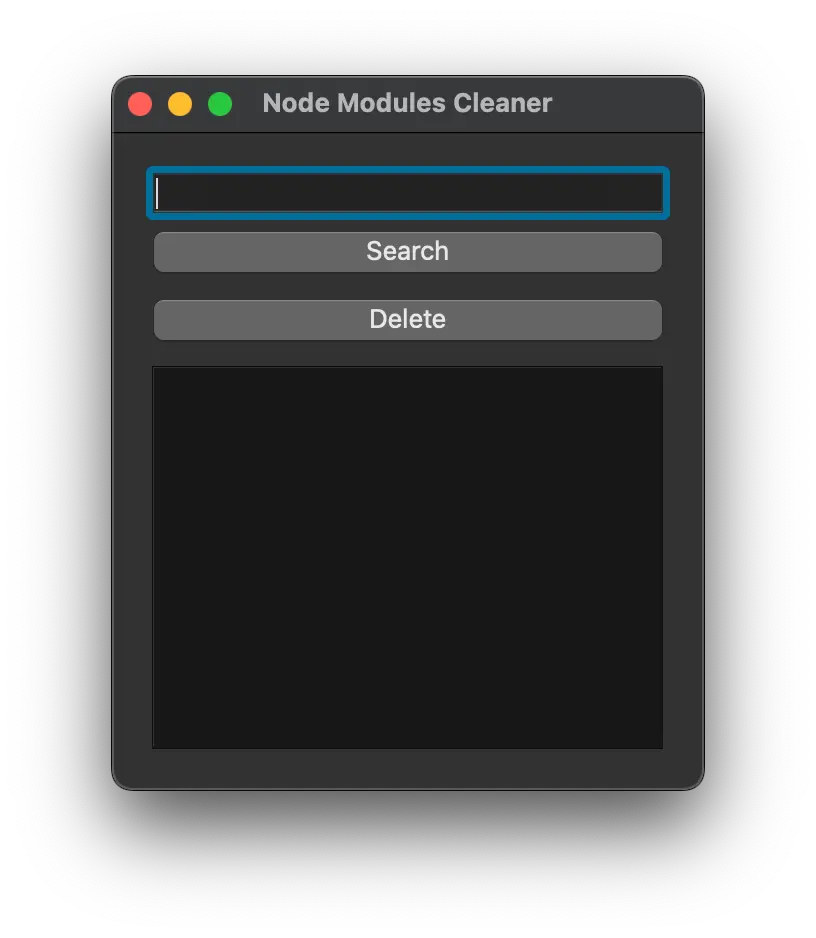
Honestly, it’s not that bad; at least it launches. It seems like the input box above is the one where we enter the parent folder. The UX is terrible, so let’s ask ChatGPT to use the native folder selection. Here’s our next query:
Change that input to native folder select input.
ChatGPT response:
You can replace the QLineEdit with a QFileDialog to let the user select a folder using a native file dialog. Here is how you can modify your code:
import os
import shutil

from PyQt6.QtWidgets import QApplication, QPushButton, QVBoxLayout, QWidget, QListWidgetItem, QListWidget, QFileDialog

class App(QWidget):
    def __init__(self):
        super().__init__()

        self.title = 'Node Modules Cleaner'
        self.initUI()

    def initUI(self):
        self.setWindowTitle(self.title)

        # Create widgets
        self.layout = QVBoxLayout()
        self.select_directory_button = QPushButton('Select Directory')
        self.search_button = QPushButton('Search')
        self.delete_button = QPushButton('Delete')
        self.modules_list = QListWidget()

        # Connect signals and slots
        self.select_directory_button.clicked.connect(self.select_directory)
        self.search_button.clicked.connect(self.search)
        self.delete_button.clicked.connect(self.delete)

        # Set layout
        self.layout.addWidget(self.select_directory_button)
        self.layout.addWidget(self.search_button)
        self.layout.addWidget(self.delete_button)
        self.layout.addWidget(self.modules_list)
        self.setLayout(self.layout)

    def select_directory(self):
        self.directory = QFileDialog.getExistingDirectory(self, "Select Directory")

    def search(self):
        for root, dirs, files in os.walk(self.directory):
            if 'node_modules' in dirs:
                item = QListWidgetItem(root + '/node_modules')
                self.modules_list.addItem(item)

    def delete(self):
        for item in self.modules_list.selectedItems():
            shutil.rmtree(item.text(), ignore_errors=True)
            self.modules_list.takeItem(self.modules_list.row(item))

# Create the application
app = QApplication([])
ex = App()
ex.show()
app.exec()
Here’s the result:
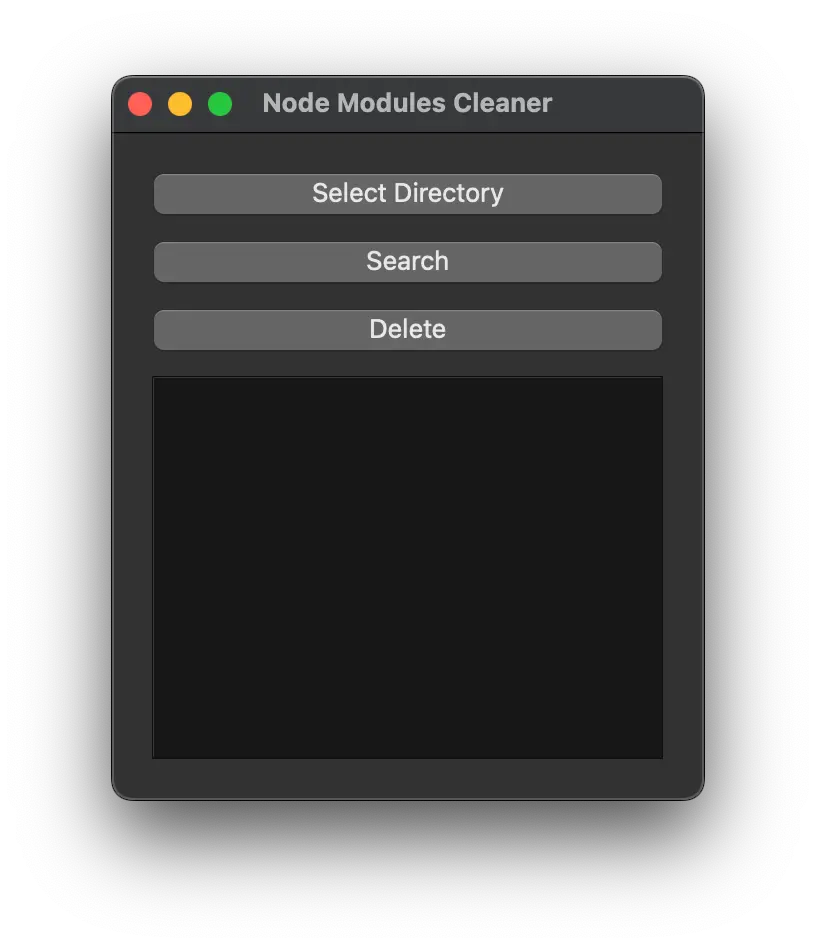
And by clicking on Select Directory, our app now launches the native folder select menu:
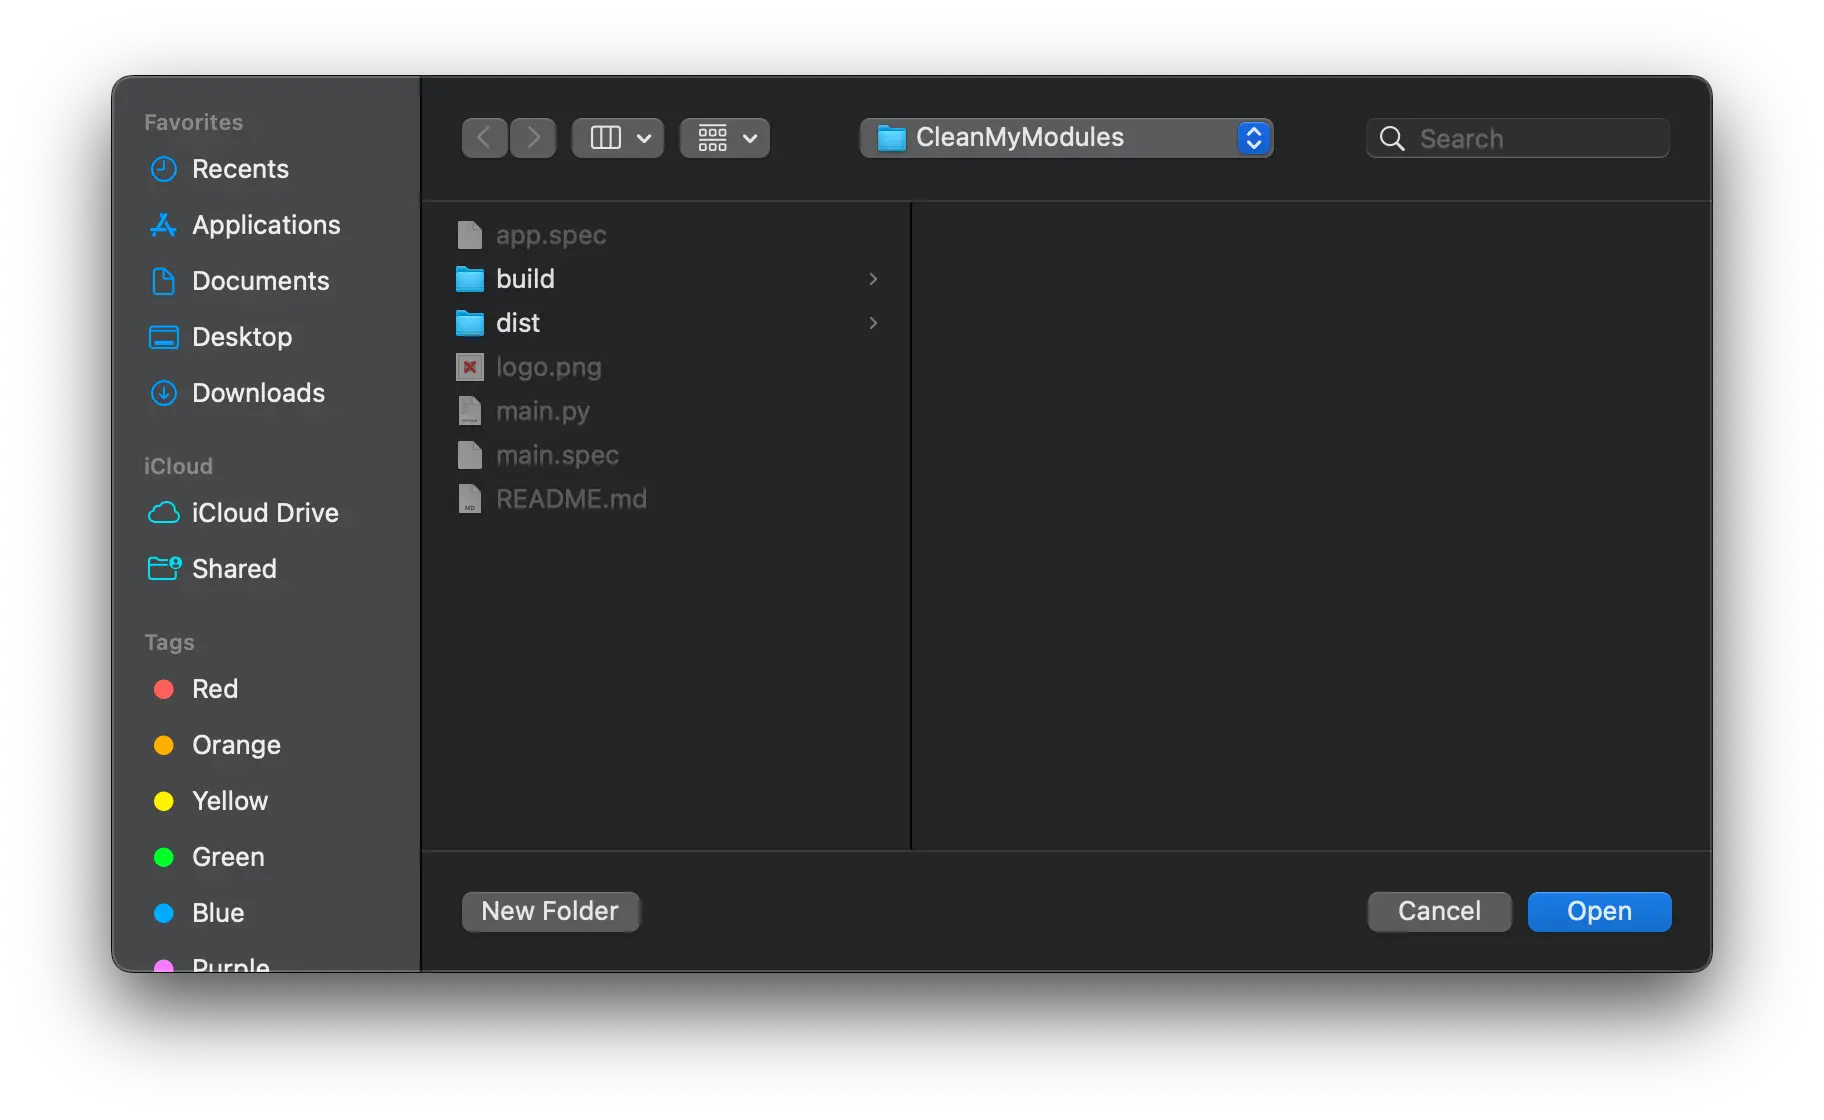
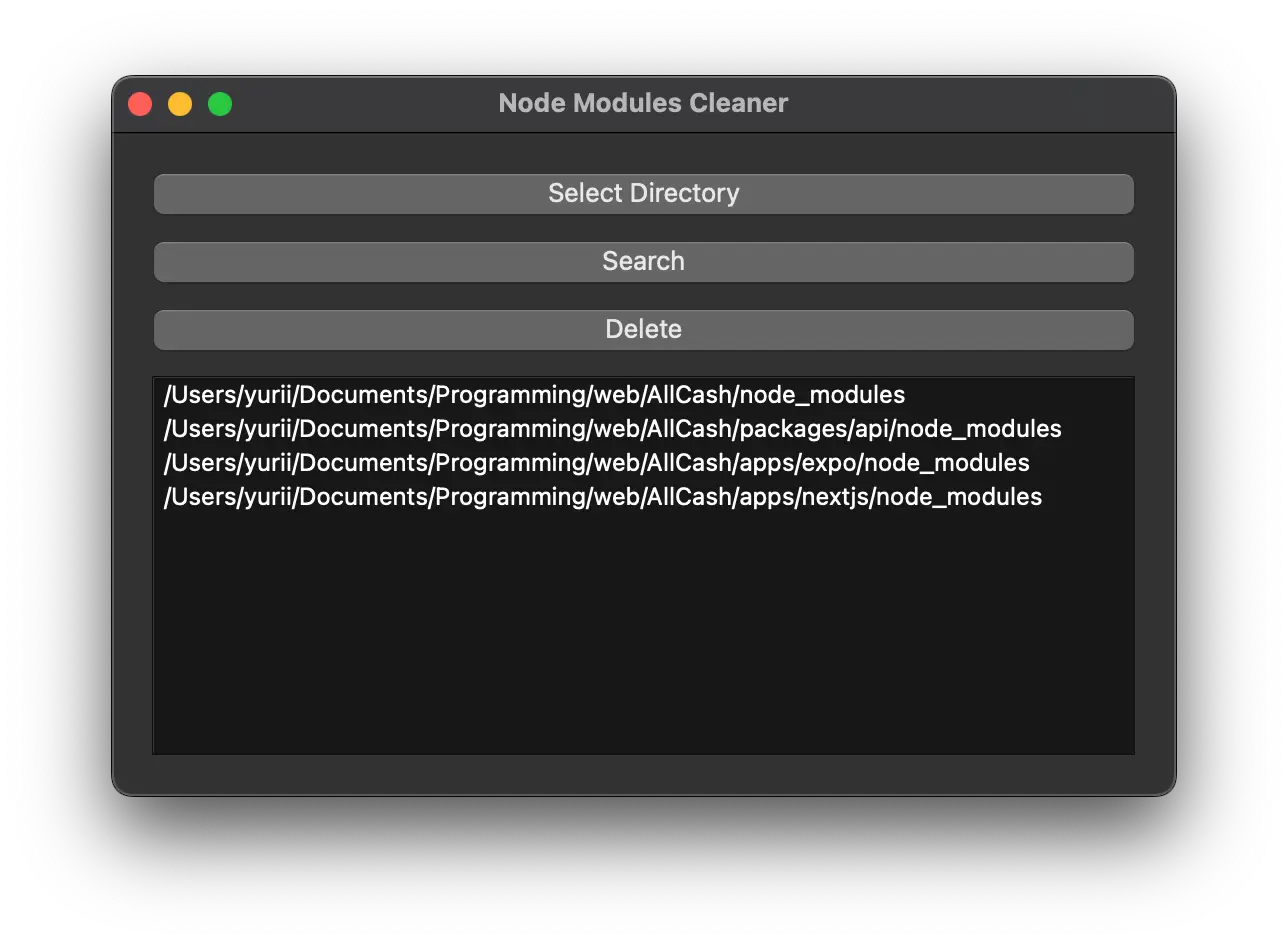
Let’s test it out and see if the app finds the node_modules dirs. Let’s select the parent dir and press “search”:
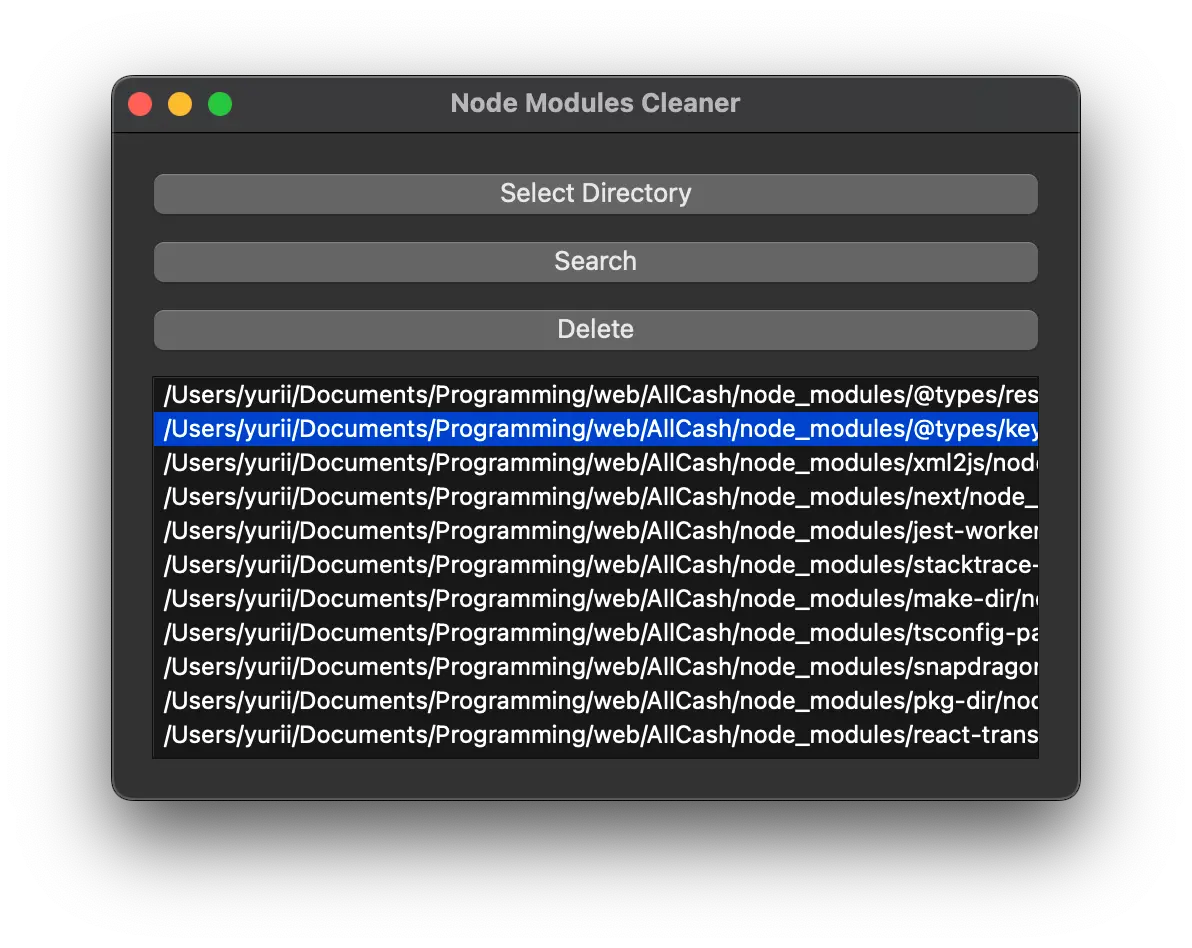
Great news! It works, but it seems like it now finds the node_modules inside the parent node_modules folder, which is not the desired behavior, as we’d like our app to clean the entire modules folder and not only selected ones.
Let’s fix it; here’s the query:
Adjust the code so that if it finds the node_modules, it doesn’t see the sub-folder node_modules. E.g., right now it renders both
/Users/yurii/Documents/Programming/web/all-cash-clean/node_modules
and /Users/vurii/Documents/Programming/web/all-cash-clean/node_modules/plist/node_modules
I want you to refactor the code so that it renders only /Users/yurii/Documents/Programming/web/all-cash-clean/node_modules
Response:
You can solve this by adjusting the way you traverse your directories. In your case, once you find a "node_modules" directory, you don't want to go deeper into it. The os.walk() function by default goes into all subdirectories.To preventos.walk()from going into "node_modules" subdirectories, you can remove "node_modules" from thedirslist. This is becauseos.walk()uses thedirslist to know which subdirectories to go into, and changes todirsare reflected in the directories it visits.
Here's how you can modify your search function:def search(self):
for root, dirs, files in os.walk(self.directory):
if 'node_modules' in dirs:
item = QListWidgetItem(root + '/node_modules')
self.modules_list.addItem(item)
# Prevent os.walk from going into 'node_modules' directories.
dirs.remove('node_modules')Let’s test launch the app and see if that will help:
Nice, it’s fixed now. The other two issues I see are that there’s no info about the selected folder and no checkbox neat the folders list to choose and delete them:
Requests:
Now add a text field to render the selected directory next to the "Select Directory" button. Split the one row in a 60/40 proportion, so that 60 is a "select directory" btn, and the 40 is for the text field to render selected dir
Add a label for that field called "selected directory", make sure that the full text is available even when the app size is small => make width of a textbox responsive, make it aligned to a new row
Add a checkbox for each found directory, and make each odd selected directory have a darker background. Add the ability to select and then delete multiple directories at once
Here’s the app result:

Excellent, now let’s add the final UI changes; I’d like the app to render each odd row in a slightly darker background:
How do i make each odd row a little darker?
Here’s the solution:
self.modules_list.setAlternatingRowColors(True)Now let’s improve the overall UX. Let’s say the user wants to clean all the node modules, so let’s ask ChatGPT to add two new buttons to Select All and Unselect All rows. Also, when searching directories right now, it feels like the app has crushed, so let’s also render a progress bar while searching and deleting the files. Last but not least, rendering a dialogue with the number of disk space cleaned will be a cool feature, so let’s ask ChatGPT to add it all and start testing the app👇
The initial Idea was to have one button called “select all,” which will transform to “unselect all” when every item was selected:
Request:
When each row is selected, change the "Select All" btn text to "Unselect all" and make each checkbox unselected. Also add a Loading UI when searching
It was generally a bad idea, so let’s ask for two different buttons instead:
Request:
ok that was a bad ui, split the "select all" | "unselect all" to two separate buttons in one row
Response:
Sure, you can create two separate buttons for "Select All" and "Unselect All" actions. You can then place these buttons side by side by adding them to a QHBoxLayout. Here's how you can modify your code:
from PyQt6.QtWidgets import QApplication, QPushButton, QVBoxLayout, QWidget, QListWidgetItem, QListWidget, QFileDialog, QLineEdit, QHBoxLayout, QLabel, QSizePolicy, QProgressDialog
from PyQt6.QtCore import Qt
from PyQt6.QtGui import QBrush, QColor

class App(QWidget):
    def __init__(self):
        super().__init__()

        self.title = 'Node Modules Cleaner'
        self.initUI()

    def initUI(self):
        self.setWindowTitle(self.title)

        # Create widgets
        self.layout = QVBoxLayout()
        self.select_directory_button = QPushButton('Select Directory')
        self.directory_display = QLineEdit()
        self.directory_display.setReadOnly(True)  # User cannot edit this field
        self.directory_display.setSizePolicy(QSizePolicy.Policy.Expanding, QSizePolicy.Policy.Fixed)  # Make width responsive

        self.directory_label = QLabel('Selected directory:')
        self.search_button = QPushButton('Search')
        self.delete_button = QPushButton('Delete')
        self.select_all_button = QPushButton('Select All')  # New button
        self.unselect_all_button = QPushButton('Unselect All')  # New button
        self.button_layout = QHBoxLayout()  # New layout for buttons
        self.modules_list = QListWidget()

        # Connect signals and slots
        self.select_directory_button.clicked.connect(self.select_directory)
        self.search_button.clicked.connect(self.search)
        self.delete_button.clicked.connect(self.delete)
        self.select_all_button.clicked.connect(self.select_all)
        self.unselect_all_button.clicked.connect(self.unselect_all)

        # Set button layout
        self.button_layout.addWidget(self.select_all_button)
        self.button_layout.addWidget(self.unselect_all_button)

        # Set main layout
        self.layout.addWidget(self.select_directory_button)
        self.layout.addWidget(self.directory_label)
        self.layout.addWidget(self.directory_display)
        self.layout.addWidget(self.search_button)
        self.layout.addWidget(self.delete_button)
        self.layout.addLayout(self.button_layout)  # Add button layout to main layout
        self.layout.addWidget(self.modules_list)
        self.setLayout(self.layout)
        self.modules_list.setAlternatingRowColors(True)

    def select_directory(self):
        self.directory = QFileDialog.getExistingDirectory(self, "Select Directory")
        self.directory_display.setText(self.directory)  # Display the selected directory

    def search(self):
        self.modules_list.clear()
        progress = QProgressDialog("Searching...", "Cancel", 0, 100, self)  # New progress dialog
        progress.setWindowModality(Qt.WindowModality.WindowModal)
        progress.setValue(0)
        progress.show()
        for i, (root, dirs, files) in enumerate(os.walk(self.directory)):
            progress.setValue((i % 100))  # Update progress dialog
            QApplication.processEvents()
            if progress.wasCanceled():
                break
            if 'node_modules' in dirs:
                item = QListWidgetItem(root + '/node_modules')
                item.setFlags(item.flags() | Qt.ItemFlag.ItemIsUserCheckable)  # Add checkbox
                item.setCheckState(Qt.CheckState.Unchecked)  # Initially unchecked

                self.modules_list.addItem(item)

                # Prevent os.walk from going into 'node_modules' directories.
                dirs.remove('node_modules')
        progress.setValue(100)  # End progress dialog

    def delete(self):
        for i in range(self.modules_list.count() - 1, -1, -1):  # Iterate in reverse order
            item = self.modules_list.item(i)
            if item.checkState() == Qt.CheckState.Checked:
                shutil.rmtree(item.text(), ignore_errors=True)
                self.modules_list.takeItem(i)

    def select_all(self):  # New slot
        for i in range(self.modules_list.count()):
            item = self.modules_list.item(i)
            item.setCheckState(Qt.CheckState.Checked)

    def unselect_all(self):  # New slot
        for i in range(self.modules_list.count()):
            item = self.modules_list.item(i)
            item.setCheckState(Qt.CheckState.Unchecked)


# Create the application
app = QApplication([])
ex = App()
ex.show()
app.exec()
In this code, I've added a new QPushButton (self.unselect_all_button) and a new slot (unselect_all). Theunselect_allslot sets the check state of all the items in the QListWidget to Unchecked. I've also created a new QHBoxLayout (self.button_layout), added the two buttons to it, and added it to the main QVBoxLayout. This places the "Select All" and "Unselect All" buttons side by side in the same row.
Requests:
add a progress for deleting too
the deleting.. dialog doesn't disspear even when deletiion is over, Fix it
Response:
The problem is that thesetValue()function for the progress dialog is called after the item is removed from the list. If the deletion is canceled or all items are deleted,self.modules_list.count()it will be less than the maximum value set for the progress dialog andsetValue()will never reach the total value. The progress dialog will not automatically close unless its value gets the maximum.
You can fix this by callingsetValue()before removing the item from the list or by callingreset()on the progress dialog after the deletion process:
def delete(self):
    progress = QProgressDialog("Deleting...", "Cancel", 0, self.modules_list.count(), self)  # New progress dialog
    progress.setWindowModality(Qt.WindowModality.WindowModal)
    progress.setValue(0)
    progress.show()
    for i in range(self.modules_list.count() - 1, -1, -1):  # Iterate in reverse order
        QApplication.processEvents()
        if progress.wasCanceled():
            break
        item = self.modules_list.item(i)
        if item.checkState() == Qt.CheckState.Checked:
            shutil.rmtree(item.text(), ignore_errors=True)
            progress.setValue(self.modules_list.count() - i)  # Update progress dialog
            self.modules_list.takeItem(i)
    progress.reset()  # Reset the progress dialog
The progress dialog should disappear when the deletion process is over or canceled.
Now let’s introduce a final touch - a pop-up saying how much space got cleaned:
Request:
After deletion, add a dialogue saying "You successfully cleaned {{SIZE_OF_DELETED_FILES}}", e.g. You successfully cleaned 15mb.
Response:
Sure, to calculate the size of the deleted directory, you can use theos.path.getsize()function. However, you need to traverse all files in the directory to get the total size. You can add a helper function to get the size of a directory. Then, you can add the sizes of all deleted directories and show aQMessageBoxwith the total size.
Here's the updated code:
from PyQt6.QtWidgets import QApplication, QPushButton, QVBoxLayout, QWidget, QListWidgetItem, QListWidget, QFileDialog, QLineEdit, QHBoxLayout, QLabel, QSizePolicy, QProgressDialog, QMessageBox
from PyQt6.QtCore import Qt
import os
import shutil

def get_size(start_path = '.'):
    total_size = 0
    for dirpath, dirnames, filenames in os.walk(start_path):
        for f in filenames:
            fp = os.path.join(dirpath, f)
            # skip if it is symbolic link
            if not os.path.islink(fp):
                total_size += os.path.getsize(fp)
    return total_size

class App(QWidget):
    def __init__(self):
        super().__init__()

        self.title = 'Node Modules Cleaner'
        self.initUI()

    def initUI(self):
        self.setWindowTitle(self.title)

        # Create widgets
        self.layout = QVBoxLayout()
        self.select_directory_button = QPushButton('Select Directory')
        self.directory_display = QLineEdit()
        self.directory_display.setReadOnly(True)  # User cannot edit this field
        self.directory_display.setSizePolicy(QSizePolicy.Policy.Expanding, QSizePolicy.Policy.Fixed)  # Make width responsive

        self.directory_label = QLabel('Selected directory:')
        self.search_button = QPushButton('Search')
        self.delete_button = QPushButton('Delete')
        self.select_all_button = QPushButton('Select All')  # New button
        self.unselect_all_button = QPushButton('Unselect All')  # New button
        self.button_layout = QHBoxLayout()  # New layout for buttons
        self.modules_list = QListWidget()

        # Connect signals and slots
        self.select_directory_button.clicked.connect(self.select_directory)
        self.search_button.clicked.connect(self.search)
        self.delete_button.clicked.connect(self.delete)
        self.select_all_button.clicked.connect(self.select_all)
        self.unselect_all_button.clicked.connect(self.unselect_all)

        # Set button layout
        self.button_layout.addWidget(self.select_all_button)
        self.button_layout.addWidget(self.unselect_all_button)

        # Set main layout
        self.layout.addWidget(self.select_directory_button)
        self.layout.addWidget(self.directory_label)
        self.layout.addWidget(self.directory_display)
        self.layout.addWidget(self.search_button)
        self.layout.addWidget(self.delete_button)
        self.layout.addLayout(self.button_layout)  # Add button layout to main layout
        self.layout.addWidget(self.modules_list)
        self.setLayout(self.layout)
        self.modules_list.setAlternatingRowColors(True)

    def select_directory(self):
        self.directory = QFileDialog.getExistingDirectory(self, "Select Directory")
        self.directory_display.setText(self.directory)  # Display the selected directory

    def search(self):
        self.modules_list.clear()
        progress = QProgressDialog("Searching...", "Cancel", 0, 100, self)  # New progress dialog
        progress.setWindowModality(Qt.WindowModality.WindowModal)
        progress.setValue(0)
        progress.show()
        for i, (root, dirs, files) in enumerate(os.walk(self.directory)):
            progress.setValue((i % 100))  # Update progress dialog
            QApplication.processEvents()
            if progress.wasCanceled():
                break
            if 'node_modules' in dirs:
                item = QListWidgetItem(root + '/node_modules')
                item.setFlags(item.flags() | Qt.ItemFlag.ItemIsUserCheckable)  # Add checkbox
                item.setCheckState(Qt.CheckState.Unchecked)  # Initially unchecked

                self.modules_list.addItem(item)

                # Prevent os.walk from going into 'node_modules' directories.
                dirs.remove('node_modules')
        progress.setValue(100)  # End progress dialog

    def delete(self):
        total_size = 0  # Initialize total size
        progress = QProgressDialog("Deleting...", "Cancel", 0, self.modules_list.count(), self)  # New progress dialog
        progress.setWindowModality(Qt.WindowModality.WindowModal)
        progress.setValue(0)
        progress.show()
        for i in range(self.modules_list.count() - 1, -1, -1):  # Iterate in reverse order
            QApplication.processEvents()
            if progress.wasCanceled():
                break
            item = self.modules_list.item(i)
            if item.checkState() == Qt.CheckState.Checked:
                if os.access(item.text(), os.W_OK):  # Check if we have write access to the directory
                    total_size += get_size(item.text())  # Add size of directory to total size
                    shutil.rmtree(item.text(), ignore_errors=True)
                    progress.setValue(self.modules_list.count() - i)  # Update progress dialog
                    self.modules_list.takeItem(i)
                else:  # If we don't have write access, show an error message
                    QMessageBox.critical(self, "Error", f"Don't have permission to delete {item.text()}")
        progress.reset()  # Reset the progress dialog
        QMessageBox.information(self, "Success", f"You successfully cleaned {total_size / (1024 * 1024):.2f}MB.")  # Show cleaned size

    def select_all(self):  # New slot
        for i in range(self.modules_list.count()):
            item = self.modules_list.item(i)
            item.setCheckState(Qt.CheckState.Checked)

    def unselect_all(self):  # New slot
        for i in range(self.modules_list.count()):
            item = self.modules_list.item(i)
            item.setCheckState(Qt.CheckState.Unchecked)


# Create the application
app = QApplication([])
ex = App()
ex.show()
app.exec()
The get_size function will traverse all the files in the directory and sum their sizes to get the total size of the directory. After the deletion process, it will show an information message box with the full size of the cleaned directories. Note that the size is converted from bytes to megabytes.
And that’s it; we have a working product in less than 2 hours, it launches, and it seems like everything is fixed. Now let’s test it and then use it to clean my hard drive!
Product Testing and Usage
It turns out that the application works perfectly; here’s the video showcase:
AI-driven Mobile App Development
AI-based Mobile App Development: Final Say
Firstly, I’d like to acknowledge that I built a utility app that solved my problem and will potentially solve the problems of other JavaScript devs using ChatGPT only. Moreover, I could do it blazingly fast, as it took me about an hour to create the app, having only an idea.
AI as a Tool, not a Replacement
Secondly, it’s crucial to understand that AI is a handy tool that can make you way more productive as a developer and engineer. It can help you avoid boring and routine work and focus on something creative. What is more, it can help you build something using technology you are not familiar with, and you just have to have some basic Computer Science knowledge and a clear vision of an end-term product.
The Future of Programming: AI-driven Mobile App Development
AI in programming is not just a future concept but a reality, demonstrated by tools like the new GitHub Copilot X. This tool integrates into your entire workflow, offering context-aware interactions. Whether you need to understand code, correct an error, or generate unit tests, GitHub Copilot X is designed to help.
It provides personalized answers referencing maintainer-written documentation, suggests task descriptions, and supports reviewers through code walkthroughs. Plus, it assists with complex shell commands directly in your terminal.
AI in programming promises improved coding speed, emphasis on business logic over boilerplate, and overall productivity enhancement. It's not a threat but an ally to programmers, aiding in more efficient, error-free development. The AI-driven future of programming is here, and it's time to adapt.
To Sum Up,
Artificial Intelligence, particularly OpenAI's ChatGPT, should primarily be seen as instrumental resources designed to augment your productivity as a software engineer. Rather than usurping the role of software engineers, AI tools are set to elevate those practitioners who are proactive in incorporating these advanced solutions into their work. Their tech-savvy counterparts may outpace those not adapting to the evolving landscape.
To remain relevant and desirable to potential employers, it is crucial to adapt to this emergent reality. AI tools are constantly developing and advancing daily, minute by minute. These advancements are consistently streamlining operations and transforming the way we work. To secure your position within this dynamic environment, it is advisable to align yourself with the tide of progress and embrace the simplicity and efficiency that these AI tools can bring to your professional life.
I’ve shared my journey into AI-driven mobile app development and how it is slowly but surely transforming the traditional programming approach. Now, we'd love to hear from you. Have you used AI in your programming projects? What are your thoughts on the future of AI in programming? Your experiences and insights are valuable, and sharing them can help us all learn and grow.
At ElifTech, we're actively using AI and implementing AI features in our projects. We believe in the power of AI to enhance our work and drive innovation. If you have any questions or are interested in exploring how AI can benefit your projects, share your AI needs with us. Let's shape the future of programming together!