

Hi there! While we continue tweaking the details on our office chatbot, we've been toggling around with yet another experiment, developing a smart bike. Our tech guys from the ElifTech R&D department (or a Cool Projects Department, as we call it) are ready to introduce a recently created device that can upgrade your bike. Sounds interesting? Then put your helmet on and keep reading!
Transforming Your Bike into a Smart Bicycle with Cycomputer
Bikes may not be the most popular means of transportation yet, but their popularity continues to grow. Today, about 30% of the population of Germany, Denmark, and the Netherlands can’t imagine their everyday lives without bikes.
Being bike riders ourselves, we decided to add a bit of gamification to the cycling process. That's how we happened upon the idea to connect smartphones and bikes to track bike rides, monitor their statistics and ensure the safety of each ride. These solution will also be handy for professional cyclists in analyzing their progress.
What the Market Has to Offer
The growing number of people who choose bikes over other vehicles has naturally affected the market of tracking devices for cyclists. The majority of these devices share the same basic functions of recording the bike's location via Google Maps, while other characteristics make devices stand out.
For example, Spy Tec STI GL300 seems to be a cyclist's go-to choice for tracking. The creators introduced the device as a tracking system for both vehicles and people, aiming to increase safety. However, it requires an Internet connection and forking over a monthly fee.
Trackmate Mini 3G H is another popular tool used for bike tracking. The device is water- and dust-proof and provides real-life tracking, meaning it can signal the bike's location when the owner is not around. Once again, safety and security seem to be the top priority.
When we started working on our own idea for smart bike tracking, we knew that similar devices existed. But each of them felt like a compromise. Yes, there are oodles of smart watches that help you keep track of your cycling activities, but they don’t connect you to the bike. Also, we wanted to make our own contribution to the IoT ecosystem and create a smart device specifically for cyclists. We wanted to make the experience engaging and personalized, all while improving user safety at the same time.
Cycomputer
We made our mothers proud and worked pretty hard on implementing this idea. We had to overcome some hardware and software challenges, and, finally, here it is:
ElifTech's cycomputer
Our MVP app works together with a wireless device attached to your bike, making it technologically advanced. Plus, your rides get more insightful and, therefore, fun. Seriously, who doesn’t like fun?
The Hardware
First, let’s look at the device. We made it:
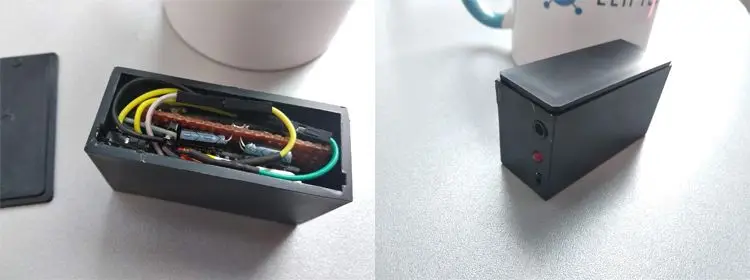
- Compact
- Wireless
- Easy to attach/detach from a bike
- With a status indication
- Waterproof
- Up to 30 hours of battery life
Not too shabby, we must say.
Software
We wanted to make a truly universal solution that would fit all kinds of users. With that in mind when creating the app, we aimed at both Android and iOS platforms. Let’s look at the screens for the functions of our Cycomputer app.
Key Features
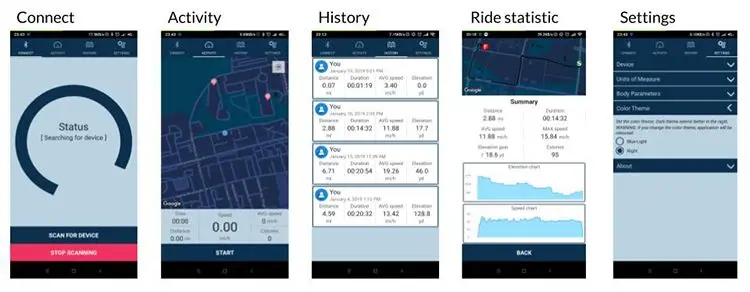
- Connect. This is the greeting tab. It shows whether the smartphone is connected to the Cycomputer hardware device or not. If you tap the Scan and Connect button, the smartphone will scan available devices nearby and connect to your Cycomputer hardware device via Bluetooth automatically.
- Activity. This tab shows the location on the map, the speed and the duration of the ride. The interface is pretty self-explanatory: clicking the Start button launches the tracker. The Pause button allows the user to stop and continue the tracking without losing data. Tapping the Finish button ends the ride. The details of each ride are displayed and stored in the log.
- History. This tab shows a short summary of all the records.
- Ride Statistics. This is the screenshot of the user's log that contains detailed records of a finished ride.
- Settings. We wanted to make sure that the app is intuitive and customizable. That’s why our Settings tab has so many personalization options, such as:
- Device name. Allows changing the name of the connected device.
- Units of measure. Users can select their preferable units of speed, distance and elevation indicators.
- Body parameters. Users fill in their weight and height to help make the calorie count more accurate.
- Color theme. Users can choose a day or a night mode for the app’s layout.
Additional Features

We’re currently working on more features to add to Cycomputer. Here are some of them:
- The SOS Signal. We know that riding a bike can be dangerous. With that said, we included a SOS signal function into the solution. If the Cycomputer device notices an unusual angle of inclination, the app shows a message, requiring you to explain the activity. If the rider doesn’t react to the message, the app will send the cyclist’s location to the emergency services.
- Extended Settings. We strived to make the app as customizable as possible, letting bike riders add a lot of personalized configurations. The Settings tab allows the cyclist to change the weight and height to improve calorie calculation accuracy or put down the phone number that will receive a message in case of an accident.
Application Challenges
Like we mentioned earlier, the app targets both Android and iPhone users, which means that we had to choose between native and hybrid mobile app development. After some considerations, we went with React Native as the platform for developing our mobile app of the connected device. For those of you who don’t know and actually have social lives, React Native is a JavaScript framework for writing real, natively rendering mobile applications for iOS and Android.
The most challenging library we’ve used on this project was react-native-maps. Here’s how we managed these and other issues while developing the software part of Cycomputer.
The React-Native-Maps Issues
One of the major tasks we aimed at completing was to activate the location tracking option. We wanted to make the cyclist's location visible on the map so that it could record the route of every ride. To do this, we chose the react-native-maps library since it’s multifunctional, easy-to-use and has great documentation. However, we started facing issues right from the get-go at the installation stage.
Access to the Google API Key
Google Maps has limited access. For us, it means that we had to register in the Google Developer console to generate the map key. The documentation describes each step of the procedure, and as soon as you get the key, you need to set it in the native Java code. This wasn’t much of a bummer, but still caused a delay.
The Map Just Didn’t Cooperate
We selected and installed the library, linked it and added the Google API key. But the map just wouldn’t show up! We later found out that the map should contain the height parameter, and ours did not have it. Once we set the explicit height in pixels, the map appeared.
The Gray Map Issue
At some point, we had the Google logo, markers, polylines and other key elements displayed, but the map background would still remain blank. We concluded that it was more likely than not an issue with the API key.
Tracking Location
The library has a whole plethora of components and possibilities to diversify and fine-tune the final project. So, we used it to choose the color theme for the map and set up the moving location of the user that makes the map shift correspondingly. All told, we used three components of the library: the map itself, markers, and the line reflecting a cyclist's path.
The bicycle's location was another challenge. The React Native framework offers using the navigator.geolocation method. So we did, but an error kept popping up. Turns out, this method is pretty slow, and that’s why we continued getting the timeout error. We used the response-native-geolocation-service library to solve the issue.
Also, the function that returns the location has three parameters. The third one lets you specify the frequency of getting information about the location. We set it to every half a second.
Calculating Vertical Distance
Tracking vertical distance is a pretty slick feature, since the more effort cyclists put into riding up, the more calories they burn. But we would need to know the altitude to calculate the elevation gain.
The library we were using to get a user's location returns the height, but the data was inaccurate and, therefore, useless. That's why we used the Google Elevation API library. We had to keep in mind that the maximum number of points of location was 512. So, to get the entire list of height differences, we had to divide the user's points of location and send several requests.
Device Challenges
Component Selection
This is the schematic of Cycomputer’s insides.
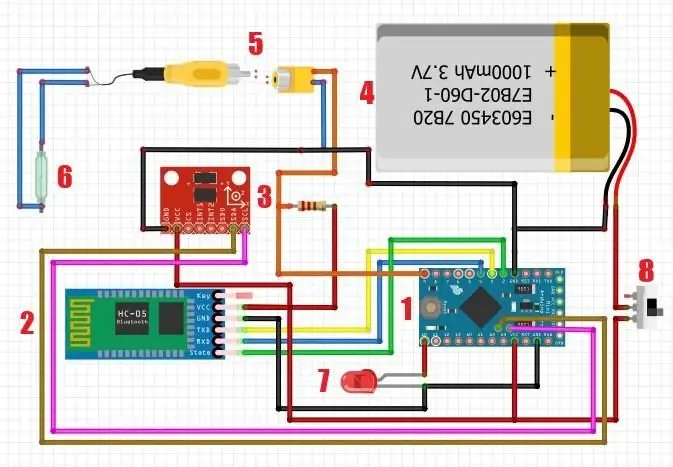
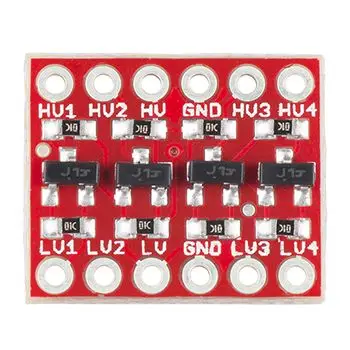
- Microcontroller
- The Bluetooth module
- The gyroscope module
- Battery
- 3.5 mm jack
- The reed switch
- LED
- The toggle switch
If you’re wondering why we chose certain components over others, keep on reading.
Why We Chose the Arduino Pro Mini Microcontroller
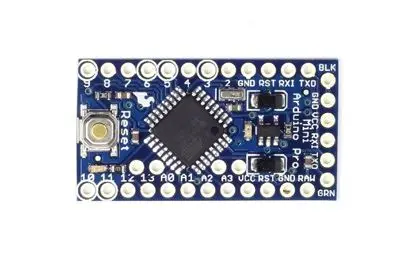
Choosing among a wide variety of microcontrollers, we’ve been looking at their technical characteristics and size. We considered power supply voltage, logic level voltage and current in both active and sleep modes. All that had to fit into an itty-bitty microcontroller. Arduino Pro Mini won in each of the categories.
Why We Chose BLE 4.0 HC-10

There are probably as many Bluetooth modules as there are microcontrollers. We aimed at the ones that were at least version 4.0 and Low Energy to achieve low current and stand-alone work for as long as possible. Choosing the BLE module that can be configured with AT-commands was also a major advantage for us.
Why We Chose ADXL345
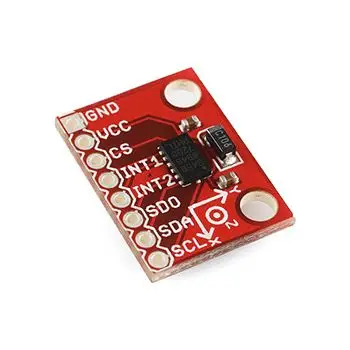
We basically chose this gyroscope module for two reasons: its size and the simplicity with which it connected to the microcontroller.
Coordination Signal Levels
Having selected the BLE module, we noticed that it only supported the 3.3 V logic level. Boy, were we glad that we chose Arduino Pro Mini with its 3.3 V logic level. Why’s that you ask? Because many Arduino modules support the 5 V logic level, and using our BLE module could break it. Another option for us was to use the 5 V logic-level microcontrollers but this would also require a resistor divider or a logic-level converter scheme. Therefore, we chose the simpler and more effective option, the Arduino Pro Mini.
Default Axle Settings
At that point, we’d already created the feature that would let someone know about a bicycle accident via SMS. Well, almost anyway, because it was ready on the device level, but we haven’t created an event listener for this feature in the app yet.
The plan was pretty simple. The microcontroller starts scanning the axis values from the gyroscope module after the user turns on the device. Then, the microcontroller disables one of the axles to ensure that the position of the other two axles is correct. This signals either the correct position of the bicycle or a fall. If the indicators are unusual, the microcontroller sends an SOS message.
Speed Measurement
We decided it was not the best idea to measure speed on the microcontroller. You see, our speed measurement is based on an event that we get from a reed switch when a bicycle wheel makes one turn. This event is processed on the microcontroller.
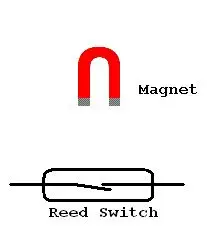
The trip history is saved on the mobile device. Based on this history, we can calculate the average speed and the current speed. That's why we decided it would be better to send the time difference in milliseconds between the reed-switch events to the phone and then calculate the speed based on it.
Energy Saving
One of the most important things for us was the battery life. To save charge, we made the device set the microcontroller and the BLE module to switch to sleep mode when no mobile device was connected and made them awaken as soon as the connection is restored. By adding this feature, we reached the device's stand-alone battery life of at least 30 hours with a 250 mAh accumulator.
Conclusion
We created a Cycomputer, a system that connects a bicycle to a smartphone. With this easily attachable device, cyclists can analyze their rides from different perspectives, both for professional and personal interests. The application allows users to track their rides, look over their ride history and know how many calories they burnt. On top of that, the device can send a SOS signal in case of an accident. And even though we came across some challenges in the process, we have overcome them and managed to create a product that makes your bike smart.
Stay tuned for more experiments from our ElifTech Cool Project Department!